Hi bloggers, I hope everyone is having a good Tuesday after the Bank Holiday Weekend. I know I've hit rock bottom after crafting most of the weekend and now its back to the revision for my university studies. Anyway, I thought I would post these photos of mum's vintage hangings that she's been working on, which will soon be available at Home Sweet Home Furniture in East Grinstead. Hopefully it will lift your spirits and give you some ideas for decorating your rooms as these hangings can be hung from wardrobe doors and on the walls and you can even hang scarves behind them for those extra touches. Enjoy!
Tuesday 8 May 2012
Sunday 6 May 2012
NSD Project
So National Scrapbooking Day has been and gone, yet I have still to complete the project I started. Inspired by a project I saw in the May edition of Scrap 365, it is an accordian scrapbook with 'flag' pages running along the top and bottom of the book. I decided to scrapbook photos of me and my sister as a mini Sister Scrapbook. The above picture is my progress so far and if you're interested in making something similar I have put a few photos and some instructions below to get you started. Or buy the new edition of the Scrap 365 magazine for further instructions from the pros.
Scrapbook Instructions
1. Firstly, you want to cut a piece of card to 8.5" high by 9" wide. Score along the width of the card at 1.5" and then every 3/4" until you have 1.5" left at the other end. In total you should have 9 score lines. Fold along each score to create an accordian look.
2. Cut two pieces of slightly thicker card (I used the back of a paper pad) to 8.5" high and 4.5" wide. Stick each one to the 1.5" part of the accordian book. Before you stick it down place some ribbon underneath the accordian in the middle. When you stick the card to the accordian, DO NOT STICK THE RIBBON DOWN, it needs to be able to move still so the accordian can be pulled together.
3. Once the covers are attached to the accordian book, you can now start to decorate. Just choose some papers for the front and back covers and also remember to cover the insides of the book as well. When sticking the inside covers down, remember to NOT STICK THE RIBBON DOWN.
4. To make the flags for the inside of the book you need to cut some slightly thick card to 4" x 4.25". You need to cut out 8 in total, 4 for the top and 4 for the bottom. Cover one side of each 'flag' with a photo and the other side with some decorative paper. When placing the flags in the book, make sure that the photo side and the decorative side alternate. E.g. When you have a photo along the top, make sure the flag below is decorative etc.
5. The picture above shows you how the flags alternate along the top and bottom and also gives an indication of how you should stick them in. Make sure the top flags stick to the first side of each bump in the accordian book. The bottom flags will stick to the back side of each hump in the accordian book. I hope this makes sense, but when you begin to stick them down you will see what I mean.
6. Continue decorating the front covers and adding embellishments to the flags.
Hope this provided an inpiration to your scrapbooking projects and with all this bad Bank Holiday weather there isn't much more we can do except craft!
Wednesday 2 May 2012
National Scrapbooking Day

Hi bloggers, I have great scrapbooking news as this Saturday is National Scrapbooking Day and what better way to celebrate then partaking in a bit of scrapbooking yourself. At the start of the year I suggested that I wanted to get back into scrapbooking especially on 12 x 12 papers as you can do so much, from a very intricate and detailed layout to the upmost simple design. I've included a few of my designs below to perhaps stir a bit of inspiration inside of you to get scrapping this weekend. Everyone has photos lying around in photo cases that are just sitting there waiting for you to express its story on a page or even in a book. Scrapbooks make the best presents and there is not time like the present to start organising your birthday and christmas gifts now. Most of my mini scrapbooks have ended up as presents for someone else, usually because once you start scrapbooking you can't stop! To find out more about National Scrapbooking Day just log onto their website, you might even find a crop near you.
Why not create your own background? For this page above I covered a plain 12 x 12 paper with a wash of distress ink then used stamps and textured paper to create different effects around the page. Simple and cheap!
And my favourite layout so far.............
This was my first detailed page and I absoultely love it, embellishing with lots of flowers, gems, stamps and ink. So much fun, I even find myself getting tempted to add even more!
Scrapbooks
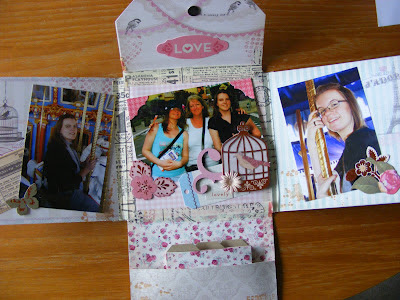
So if the 12x12 pages aren't really your thing, you could try your hand at a mini scrapbook, which make the perfect gifts. The most recent book I made was more of a scrapbook envelope with a little slot for another mini album, two albums in one!
For more scrapbook inspiration, remember to check out our Vintage Scrapbook posts from last year, really good ideas if you like the vintage theme.
Subscribe to:
Posts
(
Atom
)


